To import and export data between 10.2 XE and 11.2 XE, perform the following steps:
Copy the gen_inst.sql file from the upgrade directory of 11.2 XE shiphome to your local directory.
Connect to 10.2 XE database as SYS user and run gen_inst.sql. This will generate install.sql, gen_apps.sql and other .sql files. The files will be generated in the folder containing gen_inst.sql.
SQL> @gen_inst.sql
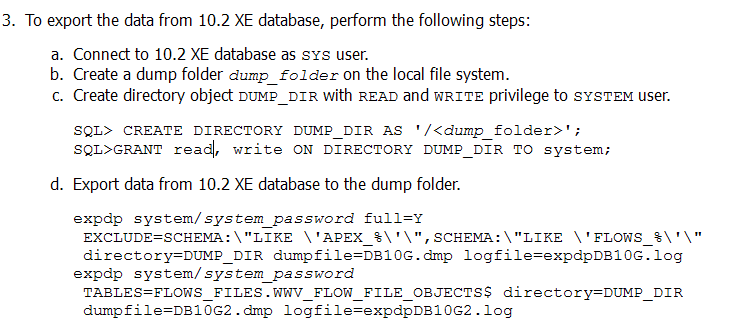
To export the data from 10.2 XE database, perform the following steps:
Connect to 10.2 XE database as SYS user.
Create a dump folder dump_folder on the local file system.
Create directory object DUMP_DIR with READ and WRITE privilege to SYSTEM user.
SQL> CREATE DIRECTORY DUMP_DIR AS '/<dump_folder>';
SQL>GRANT read, write ON DIRECTORY DUMP_DIR TO system;
Export data from 10.2 XE database to the dump folder.
expdp system/system_password full=Y
EXCLUDE=SCHEMA:\"LIKE \'APEX_%\'\",SCHEMA:\"LIKE \'FLOWS_%\'\"
directory=DUMP_DIR dumpfile=DB10G.dmp logfile=expdpDB10G.log
expdp system/system_password
TABLES=FLOWS_FILES.WWV_FLOW_FILE_OBJECTS$ directory=DUMP_DIR
dumpfile=DB10G2.dmp logfile=expdpDB10G2.log
Deinstall 10.2 XE if installation of 11.2 XE is planned on the same system.
Install 11.2 XE database. For more information see Section 4, "Installing Oracle Database XE".
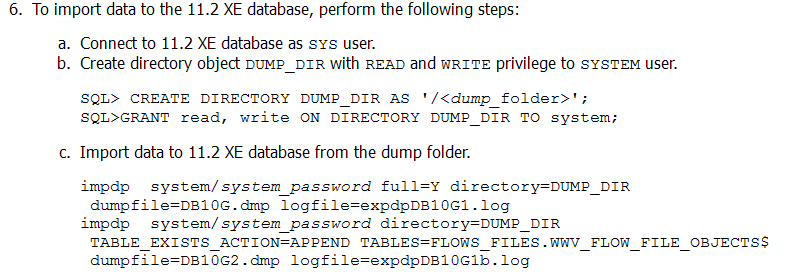
To import data to the 11.2 XE database, perform the following steps:
Connect to 11.2 XE database as SYS user.
Create directory object DUMP_DIR with READ and WRITE privilege to SYSTEM user.
SQL> CREATE DIRECTORY DUMP_DIR AS '/<dump_folder>';
SQL>GRANT read, write ON DIRECTORY DUMP_DIR TO system;
Import data to 11.2 XE database from the dump folder.
impdp system/system_password full=Y directory=DUMP_DIR
dumpfile=DB10G.dmp logfile=expdpDB10G1.log
impdp system/system_password directory=DUMP_DIR
TABLE_EXISTS_ACTION=APPEND TABLES=FLOWS_FILES.WWV_FLOW_FILE_OBJECTS$
dumpfile=DB10G2.dmp logfile=expdpDB10G1b.log
Connect to 11.2 XE database as SYS user and run the script install.sql, which was generated in Step 2. This will trigger the execution of ws.sql, gen._apps.sql, and other .sql files.
---實際步驟—

↑下載oracle11

↑↑
SQL> conn sys/密碼 as sysdba
SQL> @C:\路徑ooxxx\gen_inst.sql
產生的檔案會在【C:\oraclexe\app\oracle\product\oracle版本\server\bin\】(複製到【路徑aabb】)
↑↑↑
SQL> drop directory DUMP_DIR;
SQL> CREATE DIRECTORY DUMP_DIR AS 'C:\路徑xyz\實際資料夾名稱';
SQL>GRANT read, write ON DIRECTORY DUMP_DIR TO system;
換開cmd
expdp system/密碼 full=Y EXCLUDE=SCHEMA:\"LIKE \'APEX_%\'\",SCHEMA:\"LIKE \'FLOWS_%\'\" directory=DUMP_DIR dumpfile=DB10G.dmp logfile=expdpDB10G.log
expdp system/密碼 TABLES=FLOWS_FILES.WWV_FLOW_FILE_OBJECTS$ directory=DUMP_DIR dumpfile=DB10G2.dmp logfile=expdpDB10G2.log

↑↑移除10 安裝11
建議安裝完後先到管理者頁面(workspace:internal username:admin password:安裝時輸入的密碼)設定不要APEX表和DEMO表
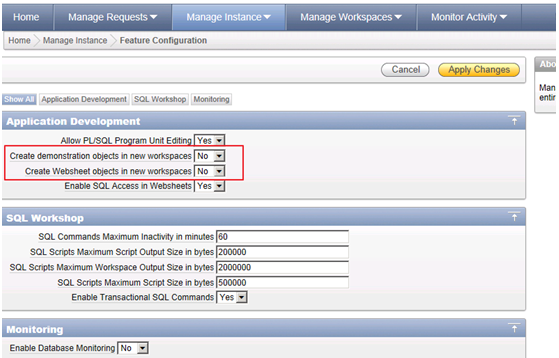
否則之後新建的schema和下一步匯入的原schema 會多了一些table
像是
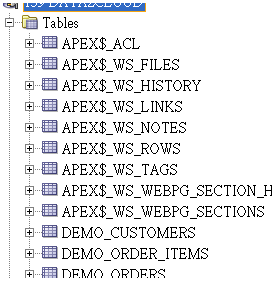
↑↑
SQL> conn sys/密碼 as sysdba
SQL> CREATE DIRECTORY DUMP_DIR AS ' C:\路徑xyz\實際資料夾名稱';
SQL>GRANT read, write ON DIRECTORY DUMP_DIR TO system;
換開cmd
impdp system/密碼 full=Y directory=DUMP_DIR dumpfile=DB10G.dmp logfile=expdpDB10G1.log
impdp system/密碼directory=DUMP_DIR TABLE_EXISTS_ACTION=APPEND TABLES=FLOWS_FILES.WWV_FLOW_FILE_OBJECTS$ dumpfile=DB10G2.dmp logfile=expdpDB10G1b.log

SQL> @C:\路徑aabb \install.sql
完成!
沒有留言:
張貼留言